
 |
| Button Monogram Pillow |
What you need:
Fabric: 1/2 yard of print fabric (fabric shown on samples is "Fontanelle" by Waverly);1/2 yard of white Kona cotton
Supplies: Vintage buttons all sizes, colors and shapes; Vintage handkerchief (10- to 12-inch square); 14-inch square pillow forms; Water-soluble stabilizer; Piping cord; Wash-away fabric marker; Fabric basting glue
Thread: Thread for lace embroidery (sample uses Isacord 9904); 60wt white thread (sample uses Mettler 60wt); 80wt pink thread for pinstitching (sample uses Madeira Cotona 80wt); Quilting thread for sewing buttons in place
Needles: Universal 70 needle; Universal 120 needle for pinstitching; Hand stitching needle to sew buttons in place
How to create:
1. Cut one 14-1/2-inch fabric square (print fabric); 1-1/4-inch-wide bias strips for 60 inches of piping (print fabric); and two 11- x 14-1/2-inch rectangles for back (white fabric).
2. Center handkerchief onto print fabric square and pin or glue-baste in place. Sew discreetly in place using either a narrow zigzag stitch, a pinstitch, decorative stitch or handstitching. If the handkerchief has lace edging it can be either left loose or tacked down.
3. Use a water-soluble marker to mark letter and button placement in corners.
4. Sew buttons in place using quilting thread.
5. We'll now begin pillow construction. NOTE: Back of pillow opens like a sham with a button closure. On back piece, fold 14-1/2 inch edge under 1/2-inch then 2-inches under and stitch in place. This is center button facing.
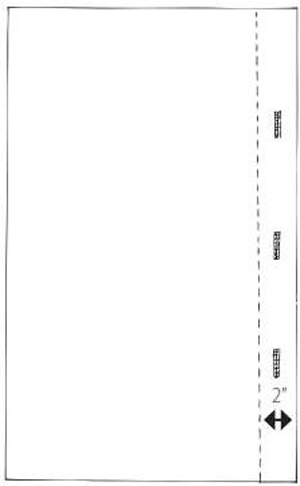 |
| Figure 1 |
6. Choose buttons for back closure, measure and mark buttonholes on one side. Stitch buttonholes and cut openings (fig. 1).
7. Overlap 2-inch hems and stitch edges together on overlapping sides. Lay top pillow onto back and square up to same measurement of front.
8. Cover 60 inches of cord with bias to make piping.
 |
| Figure 2 |
9. Stitch piping 1/4 inch away from outer edges on back pillow piece (fig. 2).
10. Stitch back to front with right sides together. Trim corners and turn right side out.
11. Sew buttons behind buttonholes on back closure.
10. Stitch back to front with right sides together. Trim corners and turn right side out.
11. Sew buttons behind buttonholes on back closure.
For more home décor design inspiration, check out our new DVD, Home Decorating: Tricks & Techniques. You'll love learning resourceful solutions to your home décor sewing dilemmas, plus tips and tricks that will change the way you sew for your home.
Sew On, Sew Well, Sew Beautiful,
Sew On, Sew Well, Sew Beautiful,
Cyndi and Amelia
While I love the idea of incorporating vintage buttons into home decor, I can't help but be distracted by the image of abusch light quack one open neon sign
ReplyDeleteThat sounds like it would be a fun and eye-catching addition to any space. I can imagine it as the perfect finishing touch for a man cave or a bar area in a home. Of course, if you're going for a more refined look, the vintage button monogram pillow would be a great way to add a personal touch to a space without going too over-the-top. Either way, it's all about finding the right balance of fun and sophistication in your home decor.